Recommended first3 months ago · 2.8K+ views
1:42 quick run
Bounce Blast Level 449 Walkthrough — Go Answer
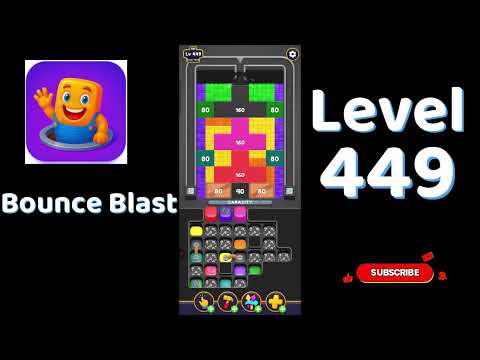
The newer and more-viewed reference. Its thumbnail clearly shows the Level 449 badge and the symmetrical 80 / 160 / 80 board.
Watch two Bounce Blast Level 449 walkthroughs, match the 80 / 160 / 80 board, and use verified video checkpoints to follow the right solution.
Start with the newer, more-viewed quick run. Use the longer recording when you need clearer mid-game checkpoints or its visible board state matches your version better.
The newer and more-viewed reference. Its thumbnail clearly shows the Level 449 badge and the symmetrical 80 / 160 / 80 board.
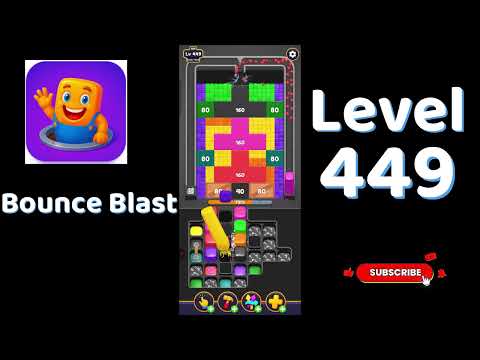
The longer alternative makes the mid-game state easier to compare and visibly reaches the completion animation.
These are visual comparison checkpoints—not an invented tap order. Open a timestamp and compare the numbers, tray shape, and side-ball position with your game.
This is the best first choice because it is newer and more viewed. The opening preview shows the Level 449 badge, twin green 80 blocks around a center 160, another 160 layer below, and the 80 / 40 / 80 base row.
Match the repeated 80 / 160 / 80 bands, the lower red 160, and the 80 / 40 / 80 base row. The lower tray should contain many dark mystery blocks and four visible boosters.
Pause after the opening actions and compare which colored shell has been removed. Do not continue if the exposed layer or lower-tray shape differs.
Use the center 160 blocks as anchors. Newly exposed numbers belong to deeper layers, so compare their position rather than assuming a counter increased.
The preview shows a thinner lower tray and active pieces moving through the upper field. If your mystery blocks are in different columns, stop copying this route.
Use the last seconds to compare the final exposed blocks and completion sequence. Preserve boosters unless the video visibly uses the same one on the same board state.
This slower recording gives a stronger diagnostic timeline. Its visible preview shows top counters 56 / 120 / 25, center and lower 160 blocks, side 80 blocks, and the same 80 / 40 / 80 base row.
The upper field is active. Visible top counters read 56 / 120 / 25 while the central pink 160, side 80 blocks, lower red 160, and 80 / 40 / 80 base remain.
The left top counter has dropped to 14, the center remains 120, and the right top section has cleared. A tall cyan reserve is visible on the left and the tray is much thinner.
The generated preview shows the Bounce completion screen and fireworks. This verifies that the longer upload reaches a solved end state rather than stopping mid-level.
Look for the repeated 80 / 160 / 80 structure and the 80 / 40 / 80 base before following either recording.
Route A is newer, shorter, and more viewed. It is the fastest way to test whether your Level 449 revision matches.
Route B gives stronger mid-game anchors: 56 / 120 / 25, then 14 / 120 with the right top section cleared.
The sources are silent gameplay recordings. Copy only actions you can see, and stop when your counters, tray, or side reserve diverge.
Both titles identify Level 449, both recordings show the Level 449 badge and Bounce Blast board, and the longer upload visibly reaches the completion animation.
At the time checked, the Go Answer upload was newer and had about 2.8K views versus about 1.9K for the longer alternative. Board match still decides which route to use.
The longer upload’s description says Level 1 even though its title and visible game badge say Level 449. We rely on the footage, not the copied description.
Neither source narrates or labels each tap. The guide reports visible board states and timestamp checkpoints without claiming an exact sequence the footage does not document in text.
Match the repeated 80 / 160 / 80 board and 80 / 40 / 80 base row. Start with the 1:42 quick run, then use the 2:25 recording’s 56 / 120 / 25 and 14 / 120 checkpoints if needed.
Yes. The Level 449 badge shown in the referenced recordings labels the stage Super Hard.
Use the Go Answer video first because it is newer and more viewed. Choose the longer recording when its board is a closer match or you need mid-game checkpoints.
Its description appears to be reused text. The title and visible in-game badge both show Level 449, so this guide verifies the footage instead.
Do not copy either route. Your game likely has another revision. Compare numbered layers, side reserve, mystery blocks, and tray shape before spending boosters.
The videos display four boosters, but do not provide a written booster-free route. Only use a booster when you can see the same action applied to the same board state.